Hey there! Happy Cinco De Mayo! As promised, I’m back today with a full set of detailed furniture plans for DIYing the homemade end tables that you saw last week on the blog. But guess what? I have a very special guest to introduce to you today. Jamison over at the Rogue Engineer is here to show you guys how to build these end tables using his amazing CAD skills!
I am SO honored and excited to be showcasing his talent here on my blog for the first time today, and hopefully you guys will see more from Jamison here in the future as an Unskinny Boppy collaborator! I am going to be introducing a few more fun collaboration projects in the near future with lots of great DIY projects from some really talented folks, so stay tuned for more!
But today, I’m SUPER excited to let Jamison walk you through the step-by-step on how to build a pair of night stands (or end tables) from scratch.
Ok, without further ado… take it away, Jamison!

About me
Hey everyone, I’m Jamison, creator and author of RogueEngineer.com. First and foremost, I’m a Christian, a father of two awesome kids, and a husband to my beautiful, supportive wife, Jamie. (Aww.. Jamison and Jamie… That’s so cute!… Yeah, Yeah. I know. Let’s move on.) I’m also an aerospace engineer by day and crazy DIY furniture ninja by night (our at least that’s how I envision it). My engineering expertise lies in mechanical design so this makes it easy for me to model up cool furniture in 3D. I’ll go ahead and admit that I’m no expert woodworker, by any stretch of the imagination. So I use my mechanical design skills to recreate popular furniture using common supplies found at most DIY box stores and in such a way that anyone can build it (including me). Learn more about me here.
Beth’s End Table
Inspiration
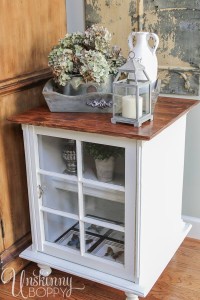
So, I got introduced to Beth a few weeks ago though my sister-in-law, and let me tell you something, she has been awesome! Being the new kid on the DIY blogging scene, and one of very few guys, I initially felt a little on my own. Getting to know Beth has been great and she has been a HUGE help to me and my site. So when she told me about these sweet end tables her and her husband had just built using old windows, I thought it would be the perfect opportunity to give back to Beth and her community. And so, the Unskinny Boppy Knock-Off End Table was born. Since Beth made out like a bandit with those awesome windows she used for doors, and well, most of us won’t be able to replicate that, I thought it would be a good idea to create a similar, easy-to-build, end table made using stock wood found at either Big Blue or Big Orange.
Required Tools
- Miter Saw
- Cordless Drill
- Pocket Hole Jig (Kreg K5 and/or Kreg R3)
- Clamp (Kreg Automaxx Face Clamp, Right Angle Clamp)
- Brad Nailer (Air Nailer, Ryobi Cordless Nailer with Battery, or Hammer and Punch)
- Tape Measure
- Level
- Square
- Eye Protection
- Ear Protection
Materials
- 2x: 1 x 6 x 8′ (Select Pine)
- 2x: 1 x 2 x 8′ (Select Pine)
- 48″ x 48″ Furniture-grade plywood
- 2x: 6′ Base Cap Moulding
- 4x: Furniture Feet
- 1-1/4″ Pocket Hole Screws
- 1-1/2″ Wood Screws
- 1-1/4″ Brad Nails
- Knob
- 2x Inset Hinge
- Catch
Cut List
Note: Blue colored boards signify stock size and the brown boards following signify how to cut those stock boards.
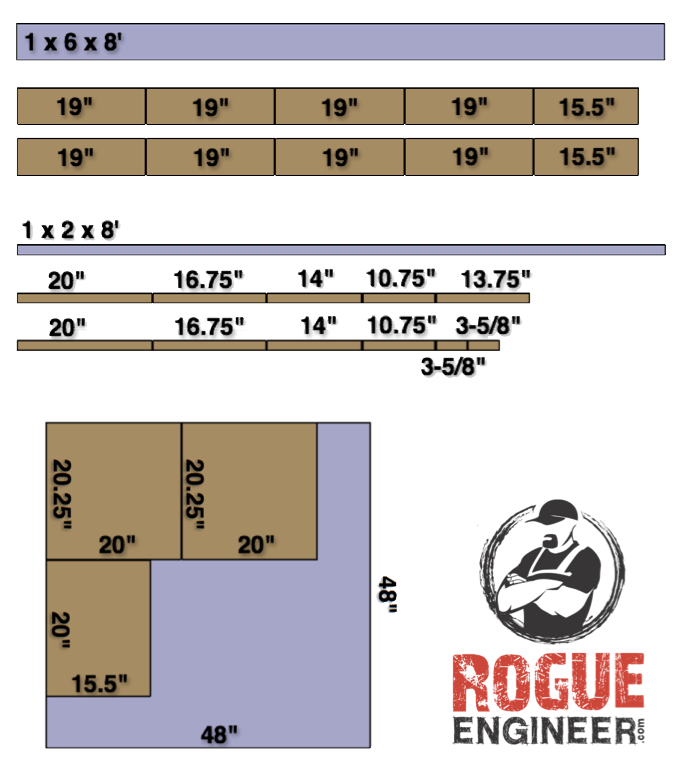
Cut List – Print This!
Plans
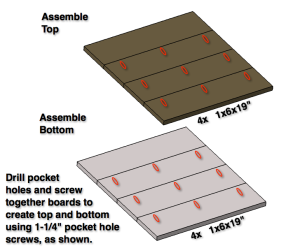
Step 1: Assemble top and bottom
Step 1: Assemble Top and Bottom
Assemble the top and bottom using eight 1x6x19″ boards; four each. Drill pocket holes, as shown, in three of the four boards for top and bottom. Align the boards, check for square, clamp and screw together using 1-1/4″ pocket hole screws.
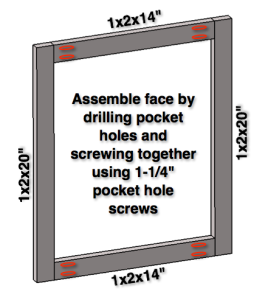
Step 2: Assemble Face.
Step 2: Assemble Face
Assemble the face of the end table by first drilling pocket holes, as shown, in each end of the two 1x2x14″ boards. Align the boards as shown, check for square, clamp and screw together usingÊ1-1/4″ pocket hole screws.
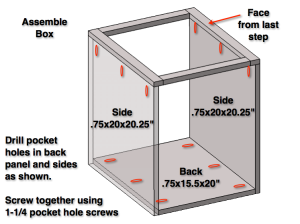
Step 3: Assemble Box
Step 3: Assemble Box
Assemble the two 20×20.25″ plywood sides to the 15.5×20″ plywood back and face (last step) by first drilling pocket holes as shown. Align the all sides as shown, check for square, clamp and screw together using 1-1/4″ pocket hole screws. (This is when a right angle clamp is good to have around)
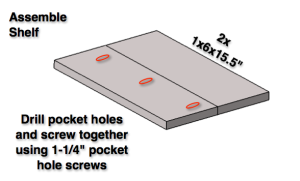
Step 4: Assemble Shelf
Step 4: Assemble Shelf
Assemble the shelf using two 1x6x15.5″ boards. Drill pocket holes, as shown, in one of the boards. Align the boards, check for square, clamp and screw together using 1-1/4″ pocket hole screws.

Step 5: Install Shelf
Step 5: Install Shelf
Install the shelf by first drilling pocket holes, as shown. Align the shelf 10″ from the bottom of the box. Check for square and level then screw in place using 1-1/4″ pocket hole screws.
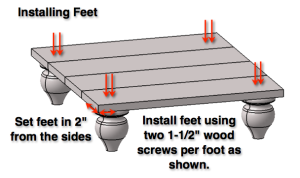
Step 6: Install Feet
Step 6: Install Feet
Locate each foot 2″ away from closest sides. ÊInstall feet using two 1-1/2″ wood screws per foot. (This prevents feet from spinning) Note: Depending on which feet you purchased you may have a screw built into the foot in which case you cane screw it in place or remove and follow the steps above.
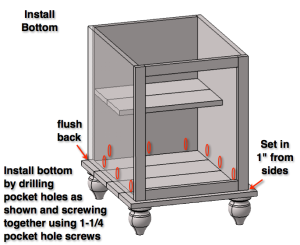
Step 7: Add Bottom to Box
Step 7: Add Bottom to Box
Install the bottom by first drilling pocket holes in the box, as shown. Align the bottom so that the back is flush with the back of the box and the sides and front are set in 1″. Then screw in place using 1-1/4″ pocket hole screws.
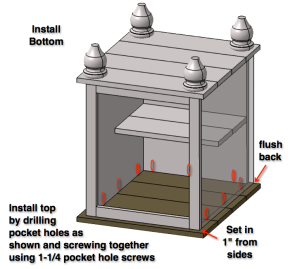
Step 8: Add Top to Box
Step 8: Add Top to Box
Install the top by first drilling pocket holes in the box, as shown. Align the top so that the back is flush with the back of the box and the sides and front are set in 1″. Then screw in place using 1-1/4″ pocket hole screws.
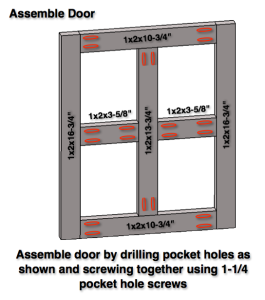
Step 9: Assemble Door
Step 9: Assemble Door
Check to make sure your opening is 14×17″. If smaller or larger adjust the door dimensions to assure 1/8″ spacing around door. Assemble the door of the end table by first drilling pocket holes, as shown, in each end of the two 1x2x10-3/4″boards, the two 1x2x3-5/8″ÊÊboards and the 1x2x13-3/4″ board. Align the boards as shown, check for center and square then clamp and screw together usingÊ1-1/4″ pocket hole screws.
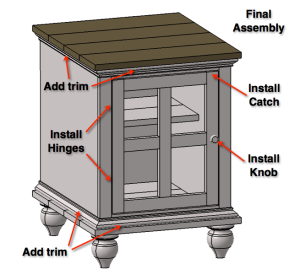
Step 10: Install trim, door, hinges, and catch
Step 10: Final Assembly
Cut the base cap moulding to size for top and bottom. Make sure to cut the moulding flush with the back of the table and miter the front corners at 45 degrees. Nail in place using a finishing nailer with 1-1/4″ brad nails. Install inset hinges by evenly spacing and screwing to end table using included mounting screws. Next install door to hinges, making sure to leave even spacing all the way around. Install knob and catch using included mounting hardware and your done.
Notes:
I know this is a ton of detailed information but I do this so that more people who may not have had the confidence to try something like this in the past will give it a try. Have fun with this project and if its your first furniture build then make sure you take your time. Be creative. These plans are here for your enjoyment so, by all means, if there’s something you want to change, go for it!
Don’t forget to post your finished product on the brag page! ENJOY!
Credit – Beth Bryan